


We all have or will experience a leaky shower faucet valve at some point. A leaky showerhead can cost you high amounts of water bills as well as cause extensive damage to your shower unit that can be very expensive to repair. Even the continuous dripping sound is enough to drive one crazy. Each week that the leakage goes unaddressed, gallons of water are wasted.
Luckily, you can quickly fix your leaky shower faucet yourself with a few tools and a bit of guidance, putting an end to your frustration as well as saving you money. Stop the mini waterfall in your bath with step-by-step instructions on how to repair a leaky shower faucet valve.
What Causes A Leaky Shower Head Drip?
If you notice water drizzles from the showerhead, this is an indication that the shower faucet set has an issue. Often, the inner parts have been clogged with hard water deposits, or the internal seals have been worn out. The gaskets and rubber 0-rings sealing the connections between metal parts are worn out with time, causing the water to drip out.
Preparation for Repair
Before you start an attempt to repair a leaky shower, you need to prepare the area appropriately. First, ensure to place -old rags on the shower floor to prevent screws and small parts from falling off down the drain. More so, ensure to turn off the shower water supply using the shower shut-off valves. If you can’t find the shower’s shut-off valves, you should turn off -all the household water supply. In this case, ensure to make appropriate timing by notifying other members of the household in advance-. You should then open the bathroom sink faucets to stream out all the remaining water from the pipes.
The shower faucet set comes in many types, and the fixing method depends on the kind of shower valve.
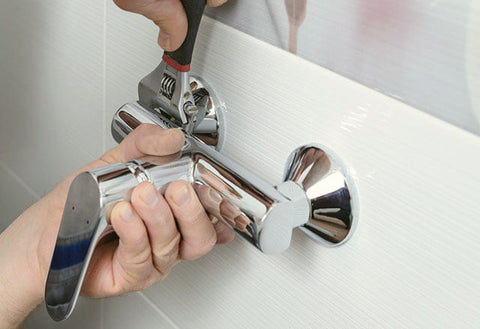
Step-To Step Guide to Repair Leaky Shower Faucets
A compression faucet, also known as a two-handle shower faucet, is the most common type of shower valve. It is run by two, one cold and one hot faucet handles. If this shower head is leaking, this is how to fix it;
- First, determine if the leakage is from a cold or warm water valve by feeling the water leaking using your hand. If the drips are cold, the leak stems from the cold-water valve and vice versa.
- Remove the shower faucet handle. This will depend on the design of the facet. If it is the decorative faucet model, it usually hides the screw behind the cover cap. With these models, you will use a thin flat screwdriver or pocket knife to pry off the cover cap and expose the screws. Then use an appropriate screwdriver to remove the screws, turning it counterclockwise and then remove the faucet handle.
- After pulling off the handle, take away the sleeve and trim that fits over the faucet stem. A hex nut is positioned over the stem of the valve and is the one that keeps it in position. You will need to use a plumber’s deep socket wrench to untie and eliminate the nut by rotating it counterclockwise. After you remove the retentive nut, you will easily hold the stem and take it out of the valve body.
- Replace the faucet washers. You will see a rubber washer pressed at the stem base. Remove it using pliers and substitute it with another one of the same sizes. You should also replace the seals and O-rings to ensure you leave no space for any cause of leakage. Unsure the replaced -washer seats correctly. Lubricating the washer using plumber’s grease will offer a perfect stopper and shield the washer from leaking. Also, examine the stem for indemnities, and if this has occurred, you should replace it entirely. Make sure to get the exact match.
- Reassemble your shower faucet by reversing the procedures. Before you place the faucet stem back in the valve body, use the plumber's grease to lubricate the threads and tighten it in the valve body. Finish the reassembly of the faucet handle and open the water to your shower to test whether the leakage.
Conclusion
These easy steps will help you to repair your shower system and avoid costly utility bills- easily. However, if the drip continues, you should seek the assistance of a professional plumber.